Are you tired of your plain-text Amazon description? You know, the one that can’t have any italics, bold text, lists, or headers? It probably looks a little like this:

You’ve probably seen other books on Amazon with all sorts of text styles in the descriptions, like this one:

You may have jealously wondered, “How can I get my description to look like that?” The answer isn’t obvious, but it’s also not hard! Let’s look at it together.
Following Amazon’s Rules
First, it’s important to check on which HTML tags are allowed. (For those who don’t know what HTML tags are, don’t worry. We’ll look at them in a minute.) Amazon has a very hidden page in the Kindle Direct Publishing guidelines which outlines all the tags that are supported in your description. You might want to take a minute and read it.
That list is great, but it’s also really techie for those who don’t know how in the world HTML tags work. A complete guide to using HTML is beyond the scope of this article, but what I can do is show you an example of what each allowed tag will do if you put it in your Amazon description.
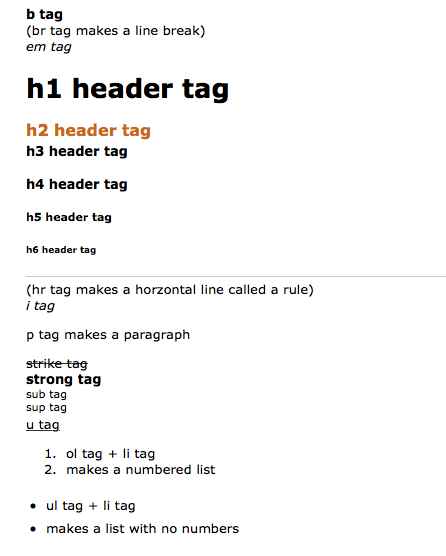
That looks a little bit overwhelming, but don’t worry. You don’t have to use all of those tags, and you’ll actually look more professional if you limit your palette. Here are the tags I recommend you actually use:
- <h2></h2> for making a big tagline.
- <p></p> for paragraphs.
- <em></em> to italicize your book title or an excerpt.
- <strong></strong> to make bold text for emphasis.
- <ul></ul> with <li></li> to create bullet points if your book is nonfiction.
That’s not so bad, is it? Now, let’s look at how to use them properly.
Following the Conventions
You’ll find many Amazon descriptions using styles inappropriately. They’ll put headers willy-nilly with no thought to how these are meant to be used. Or they toss italics and bold where no emphasis is truly needed, making the book pitch look like one of those spammy e-mails you so quickly delete. So you can avoid looking dumb, let’s lay out some basic formatting rules for your description.
Rule #1: Headers go in order. All of those h1, h2, h3, etc. tags are meant to be used in a hierarchy. The biggest number goes first to headline a section, and then if you have subheads in the section, you use the next number down. For example, this image shows an Amazon description with an h1 header, followed by an h2 header.

In other words, don’t go using the h2 tag just because you want orange text. It’s a header designed to start a new section, so treat it that way. But that’s not the only thing you need to know about headers. Which leads me to the next rule.
Rule #2: Don’t preempt Amazon’s layout. You see that big orange text above your description that says “Book Description”? That’s an h2 style. That means Amazon has already created a section on your page for the description. And that means that your first section heading style should be an h3, in keeping with the style that Amazon has set forth. Otherwise, a section in your book description will appear to be a new section of the product page on Amazon, not a new section of your description. I know you probably wanted to use that flashy orange text, but it’s simply not a good practice.
Rule #3: Use italics and bold sparingly. Italics are for emphasis or to set off a book title. Bold is for emphasis. You shouldn’t write a sentence like this one I’m creating right now. Yuck. Reminds me of a college textbook with all the “important” words pre-highlighted for you. Instead, use italics to set off book titles or large quotes. If your book is nonfiction, you can use bold text to highlight key features, but if you’re marketing fiction, you’re better off skipping bold altogether.
Crafting a Well-Formatted Description
With all the rules out of the way, we can finally do the fun part. Let’s take your description and make it look amazing.
Here’s a quick tip before we jump into the action: If you’re comfortable with HTML tags and you’re using a web browser with dev tools, you can stealthily use the Inspect Element command (Chrome or Safari) or Page Inspector (Firefox) to play with Amazon’s page source code (only for you in your browser) and test your ideas on your Amazon page before you actually save changes. It’s a great way to see how everything will look without waiting 12 hours for Amazon to publish your new description, only to discover it doesn’t look right.
It’s difficult to describe a book description, so what I’m going to do is give you a template that should work nicely for you. If you’re a Fix My Story mailing list subscriber, check the bonus area for three more.
<p><em>Put your book excerpt here.</em></p>
<p>Your description. (Add as many paragraphs as needed.)</p>
Important: I’ve put blank lines between the tags so you can more easily see the template. However, if you paste it into your description like this, Amazon will add blank lines between your paragraphs, which just looks ugly. You’ll want to delete the blank lines so it looks like this before you save it:
<p><em>Put your book excerpt here.</em></p><p>Your description. (Add as many paragraphs as needed.)</p>
Filled in with a nice excerpt and description, the above template could look something like this:

This template gives you a place at the top to put an excerpt from your book. You want to find a good compelling paragraph that will draw the reader in. Consider this paragraph your hook to get a customer to check out the free sample.
You are now ready to enter the world of fancy Amazon descriptions! Have fun!
(And if you need help actually writing your Amazon description, I’ve got just the article for you.)
Fix My Story mailing list subscribers, check your bonus page for three more Amazon description templates! Learn to make your description look like this:
Click to get your bonus content for this article.
(Not a subscriber yet? Sign up for free and get access now!)
Whoa, wait a minute…you can do all this right from the KDP interface? I had no idea! I’ve been editing my description via Author Central. I just discovered recently that any time you make a change to your book (changing the price for a sale, for instance), your description reverts back to how you originally entered it at KDP, so I’ve been having to re-edit at Author Central every time I tweaked a price. Needless to say, that was a pain in the neck, and I’m awfully glad to discover there’s another way!
Hi- is this for KDP when writing the book description or Author Central? Thanks for the tips.
Do this in the book description section of KDP, not in Author Central. For some reason, while Author Central accepts HTML, it doesn’t seem to like all of the tags that KDP will accept.
Dear Sir, my TAGES aren’t making my titles a pretty orange colour! Why? Please help!
Are you using the
H2tags? That’s the one that makes the orange color.One things that I noticed on my Android phone (I don’t know if this applies to every phone or not) is when a book is viewed I can only see about the first 40 words of the description before I have to click to read more. Make sure those 40 words pull people in, because readers won’t click to read more if they’re not interested. Try to look at your book description on as many different types of screens as you can to make sure it looks right everywhere.
Hi there. Nice article.
I’ve created a free online tool that helps with this.
http://www.ryankhoward.com/book-desc-editor/
Cheers,
Ryan K. Howard
Great tool! Thanks for sharing.
Might I make a suggestion for improving the tool? Where the tool offers the different text sizes, it could be better to label those buttons as headers, since different size headers matter for search engine optimization and proper formatting. That way, you’re helping the user create a well-formatted description. 🙂
Hi Jordan. Thanks, I’m glad you like the tool.
Regarding the different text sizes, I do translate them to headers in the generated HTML. I just didn’t label the buttons H1, H2, etc because that doesn’t mean much to most non-HTML folks but the resulting HMTL generated uses header tags.
Ryan, THANK YOU. Question- do I cut and paste my modified descritpion into Create space AND the Amazon Kindle Direct description? How long does it take to load?
You should be able to use the same description on both CreateSpace and KDP. In my experience, though, it’s better to do the paperback description from your Amazon Author dashboard if you have that set up.
I just used your online tool and it was great! Thanks for making something that has been a bit of pain, a heck of a lot easier. I’m a fan!
Though the topic is old there is a great, simple solution. If you have a wordpress blog simply go into WordPress, create a new page, paste in your sales page text from word (or whatever you prefer to type in) format the page with whatever bold, italics etc that you want. Now switch from visual to the text tab (upper right). Your page will be shown with full HTML codes embedded. Highlight and copy that version and just paste it into the KDP book description page. A few hours later your sales page will look exactly how you want it. Simple and requires no learning of HTML.
Great tip! This should work in most cases. Amazon’s HTML parser seems to be a little bit wonky, though, so I would highly recommend making sure any HTML generator’s formatting looks right on Amazon after you submit your changes. Be prepared to make edits to get it to look right.
Just as a heads up to people coming here in 2017–You can use H1 and H2 tags in your descriptions and be fine if that’s what you want to do. Without getting too technical, the Book Description is served to the Product Page as a separate html page within an iFrame.
Good tip!
This is great info, thank you! I’m surprised that nowhere in the Kindle Direct Publishing site does it tell you that you can even do this. Thank you for writing this up.